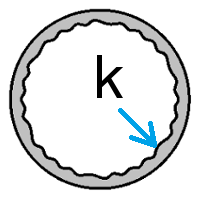
Absolute roughness
| Pipe Material | Absolute roughness k (mm) |
|---|---|
| Aluminum new | 0,001-0,002 |
| Brass | 0,015 |
| Brass new | 0,001-0,002 |
| Cast iron new | 0,25-0,8 |
| Cast iron slightly rusted | 1,5 |
| Cast iron very rusted | 3 |
| Cast iron with bitumen layer | 0,2 |
| Copper | 0,015 |
| Copper new | 0,001-0,002 |
| Epoxy, vinyl ester and isophthalic pipe | 0,005 |
| Flexible rubber tubing smooth | 0,006-0,07 |
| Glass | 0,015 |
| Lead | 0,015 |
| Lead new | 0,001-0,002 |
| Ordinary concrete | 0,3-1 |
| PVC and Plastic pipes | 0,0015-0,007 |
| Rough concrete | 0,3-5 |
| Sheet or asphalted cast iron | 0,01-0,015 |
| Smoothed cement | 0,3 |
| Stainless steel electropolished | 0,0001-0,0008 |
| Stainless steel turned | 0,0004-0,006 |
| Stainless steel, bead blasted | 0,001-0,006 |
| Steel pipe after longer use | 0,2 |
| Steel pipe galvanised | 0,15 |
| Steel pipe new | 0,04 |
| Steel pipe slightly rusted | 0,4 |
| Steel pipe very rusted | 3,35 |
| Stretched steel | 0,015 |
| Weld steel | 0,045 |
| Worn cast iron | 0,8-1,5 |
Absolute Roughness (k) is a measure of pipe wall irregularities. The absolute roughness has dimensions of length and is usually expressed in millimeter (mm) or feet (ft). Absolute Roughness is usually defined for a material and can be measured experimentally. Absolute roughness is important when calculating pressure drop particularly in the turbulent flow regime.
For each pipe material either a single pipe roughness value or a range of roughness values is normally provided by the manufacturer. The roughness value, usually denoted as e or k, is used in the calculating the relative roughness of a pipe against the size of its diameter.

